概要信息:
© Les Mills International Ltd 2015RPM 69
RPM – BIKE SETUP
Before you begin the class use the 'on-the-bike quick check' to make sure your riders are riding in a
safe and effective position.
SEAT HEIGHT
Bring your feet to 12 o’clock and 6 o’clock. Take out your bottom foot and place your heel over the pedal. With
a straight leg and hips level, your heel should just touch the pedal – a good seat height for generating great
force production. If your heel easily touches the pedal and the knee is bent, then the seat is too low. If you can
not reach the pedal without losing your hip alignment, then your seat is too high.
SEAT FORE AND AFT
With the pedals at 3 o’clock and 9 o’clock, position the saddle so the front knee is in line with the pedal axle or
the top toe strap of the front pedal. If the knee is back of the pedal axle, the seat needs to be moved forward.
If the knee is forward of the pedal axle the seat needs to be moved back.
HANDLEBAR HEIGHT
The handlebar height should be slightly lower or level with the saddle. Beginners or people with lower back
problems should have the handlebars slightly higher than the saddle.
HANDLEBAR FORWARD AND BACK
In Racing, you should have a 90-degree angle between your upper arm and your torso. If you feel like you need
to slide forward in the saddle to create the 90-degree angle, move your handlebars a little closer.
RPM POSITION GLOSSARY
KEY RPM RIDING POSITIONS
Throughout the ride we use different riding positions. These impose slightly different demands on the body and
the working muscles. Changing positions brings maximum benefits, avoids over-stressing the body and brings
variety to the ride, which is an important factor in indoor cycling.
Some positions are used at specific paces or resistances as they are designed for speed, climbing, power or
recovery. Others are used with all paces and resistance. Your goal is to ride both effectively and efficiently in
each position and have your participants do the same.
RIDE EASY
LAYER 1
• Tip forward from the hip
• Sit back in the saddle
• Hands shoulder-width apart
• 90-degree angle at your upper arm and torso
• Lengthen the back of the neck and tuck in chin
• Chest lifted
• Shoulders back
• Soft elbows
• Upper body relaxed
• Hips, knees, ankles in line
• Middle of kneecap in line with 2nd toe
• Eyes 6½ feet (2 meters) in front of flywheel
LAYER 2
• Shoulders away from ears
• Relaxed upper body to help with recovery
• Hands wide to help with your breathing
This is the basic riding position and can also be
used for recovery. It’s used with light to moderate
Climbing Resistance either at the start of the track,
to provide active recovery through the track, or
when we start to build intensity at the beginning of
work phases.
RACING
LAYER 1
• Hinge from the hips
• Reach arms forward
• Slide the butt back
• 90-degree angle at your upper
arm and torso
• Chest lifted
• Shoulders back and down
• Bend through your elbows
• Abs in and braced
• Lengthen the back of your neck and tuck in chin
• Eyes 6½ feet (2 meters) in front of flywheel
• Hips, knees, ankles in line
LAYER 2
• Reach long into the dippers, keep your elbows
bent
• Slide back on the saddle, feel the glutes and
hamstrings
• Belly strong, keep your upper body still
• Maintain good knee alignment, middle of kneecap
in line with middle of foot
This is a riding position, not a cue to automatically
go faster. However, generally we move to a period
of increased intensity using slightly more resistance
and/or faster speed.
Don’t overreach in this position because we don’t
want to compromise the lower back, the shoulders
or the neck. This forward position gives us a wider
base of support and slightly changes the hip angle,
allowing a change in recruitment of the gluteals and
hamstrings; therefore, it puts you in the best position
to work harder. Used in Tracks 1, 2, 4, 5 and 6.
© Les Mills International Ltd 2015RPM 69
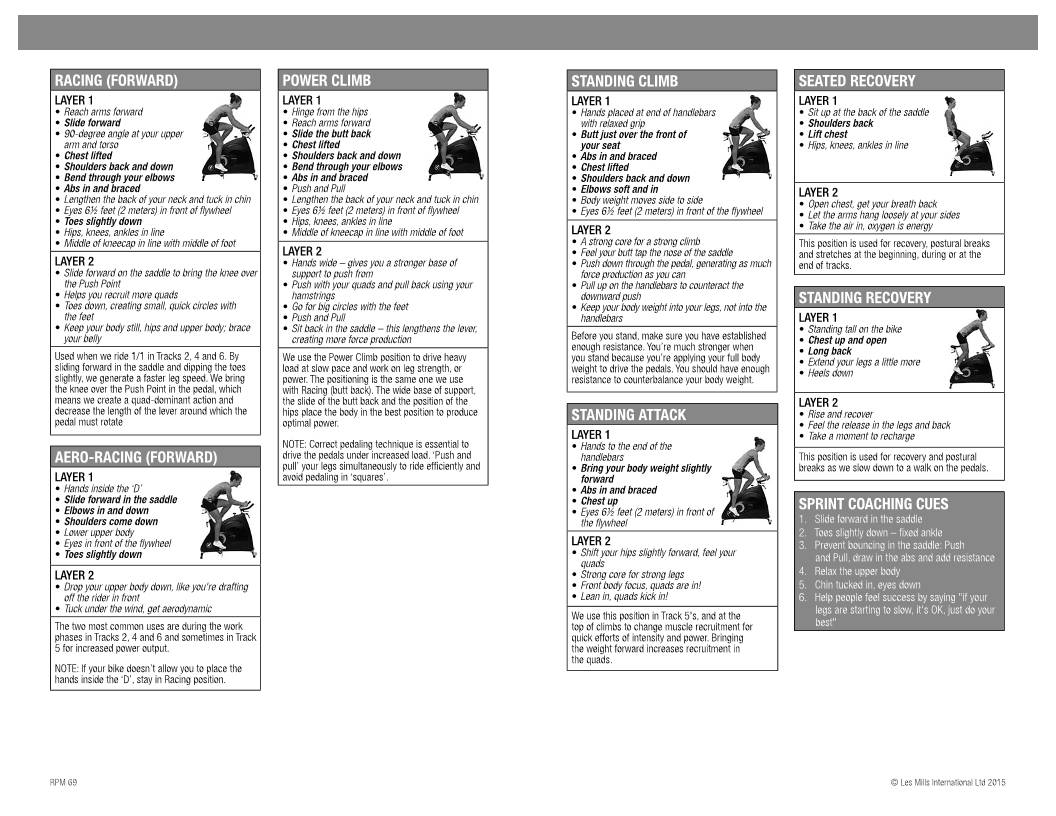
POWER CLIMB
LAYER 1
• Hinge from the hips
• Reach arms forward
• Slide the butt back
• Chest lifted
• Shoulders back and down
• Bend through your elbows
• Abs in and braced
• Push and Pull
• Lengthen the back of your neck and tuck in chin
• Eyes 6½ feet (2 meters) in front of flywheel
• Hips, knees, ankles in line
• Middle of kneecap in line with middle of foot
LAYER 2
• Hands wide – gives you a stronger base of
support to push from
• Push with your quads and pull back using your
hamstrings
• Go for big circles with the feet
• Push and Pull
• Sit back in the saddle – this lengthens the lever,
creating more force production
We use the Power Climb position to drive heavy
load at slow pace and work on leg strength, or
power. The positioning is the same one we use
with Racing (butt back). The wide base of support,
the slide of the butt back and the position of the
hips place the body in the best position to produce
optimal power.
NOTE: Correct pedaling technique is essential to
drive the pedals under increased load. ‘Push and
pull’ your legs simultaneously to ride efficiently and
avoid pedaling in ‘squares’.
AERO-RACING (FORWARD)
LAYER 1
• Hands inside the ‘D’
• Slide forward in the saddle
• Elbows in and down
• Shoulders come down
• Lower upper body
• Eyes in front of the flywheel
• Toes slightly down
LAYER 2
• Drop your upper body down, like you're drafting
off the rider in front
• Tuck under the wind, get aerodynamic
The two most common uses are during the work
phases in Tracks 2, 4 and 6 and sometimes in Track
5 for increased power output.
NOTE: If your bike doesn’t allow you to place the
hands inside the ‘D’, stay in Racing position.
RACING (FORWARD)
LAYER 1
• Reach arms forward
• Slide forward
• 90-degree angle at your upper
arm and torso
• Chest lifted
• Shoulders back and down
• Bend through your elbows
• Abs in and braced
• Lengthen the back of your neck and tuck in chin
• Eyes 6½ feet (2 meters) in front of flywheel
• Toes slightly down
• Hips, knees, ankles in line
• Middle of kneecap in line with middle of foot
LAYER 2
• Slide forward on the saddle to bring the knee over
the Push Point
• Helps you recruit more quads
• Toes down, creating small, quick circles with
the feet
• Keep your body still, hips and upper body; brace
your belly
Used when we ride 1/1 in Tracks 2, 4 and 6. By
sliding forward in the saddle and dipping the toes
slightly, we generate a faster leg speed. We bring
the knee over the Push Point in the pedal, which
means we create a quad-dominant action and
decrease the length of the lever around which the
pedal must rotate
STANDING ATTACK
LAYER 1
• Hands to the end of the
handlebars
• Bring your body weight slightly
forward
• Abs in and braced
• Chest up
• Eyes 6½ feet (2 meters) in front of
the flywheel
LAYER 2
• Shift your hips slightly forward, feel your
quads
• Strong core for strong legs
• Front body focus, quads are in!
• Lean in, quads kick in!
We use this position in Track 5's, and at the
top of climbs to change muscle recruitment for
quick efforts of intensity and power. Bringing
the weight forward increases recruitment in
the quads.
SEATED RECOVERY
LAYER 1
• Sit up at the back of the saddle
• Shoulders back
• Lift chest
• Hips, knees, ankles in line
LAYER 2
• Open chest, get your breath back
• Let the arms hang loosely at your sides
• Take the air in, oxygen is energy
This position is used for recovery, postural breaks
and stretches at the beginning, during or at the
end of tracks.
STANDING RECOVERY
LAYER 1
• Standing tall on the bike
• Chest up and open
• Long back
• Extend your legs a little more
• Heels down
LAYER 2
• Rise and recover
• Feel the release in the legs and back
• Take a moment to recharge
This position is used for recovery and postural
breaks as we slow down to a walk on the pedals.
STANDING CLIMB
LAYER 1
• Hands placed at end of handlebars
with relaxed grip
• Butt just over the front of
your seat
• Abs in and braced
• Chest lifted
• Shoulders back and down
• Elbows soft and in
• Body weight moves side to side
• Eyes 6½ feet (2 meters) in front of the flywheel
LAYER 2
• A strong core for a strong climb
• Feel your butt tap the nose of the saddle
• Push down through the pedal, generating as much
force production as you can
• Pull up on the handlebars to counteract the
downward push
• Keep your body weight into your legs, not into the
handlebars
Before you stand, make sure you have established
enough resistance. You’re much stronger when
you stand because you’re applying your full body
weight to drive the pedals. You should have enough
resistance to counterbalance your body weight.
SPRINT COACHING CUES
1. Slide forward in the saddle
2. Toes slightly down – fixed ankle
3. Prevent bouncing in the saddle: Push
and Pull, draw in the abs and add resistance
4. Relax the upper body
5. Chin tucked in, eyes down
6. Help people feel success by saying "if your
legs are starting to slow, it's OK, just do your
best"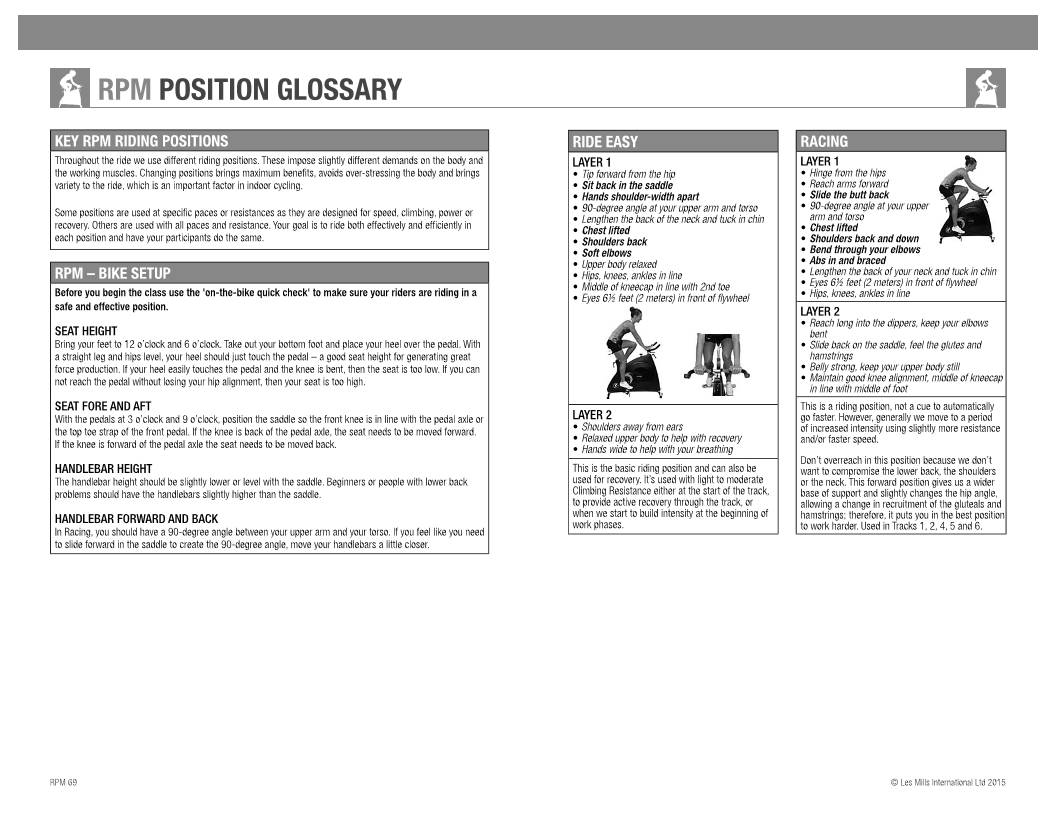
 WMS仓库系统